
How to Make a DIY Duct Tape Wallet for 18 Inch Dolls
Teeny tiny wallets for 18" dolls aren't the easiest thing in the world to sew, but we've got you covered with this fun and easy DIY tutorial to make an 18 inch doll wallet out of decorative duct tape you can find at the Dollar Store!
Bonus: when you download the FREE PDF guide, you'll get the free doll money and credit card printables so you have something to fill up the wallet right away :)
For this project, you'll just need the duct tape, something to cut with, and a small square of hook and loop tape (Velcro®), or anything else to serve as a small fastener for the flap of the wallet.
Let's get to it...
Step 1. Cut two strips of decorative duct tape slightly longer than 3 inches and attach sticky sides together. This will be the front of the wallet.
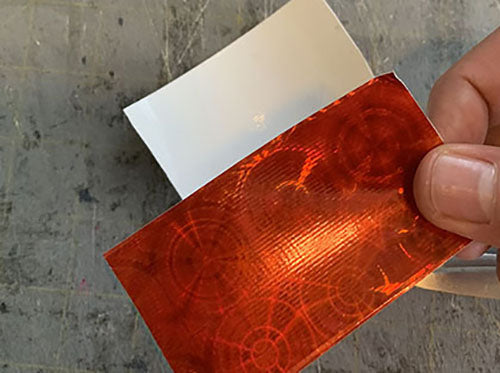
Note: The colors you choose will determine the outside and lining colors. With this tutorial I made a red outside with silver lining but you can get as creative as you want here!
Step 2. Position the square pattern piece on the tape inside the edges. If you haven't downloaded the free PDF with the pattern pieces, it's 2 1/2" by 1 1/4".

Step 3. Cut the front piece of the wallet out. I used ruler and razor for precision but scissors will work too.

Step 4. Repeat step one to make the piece for the wallet flap. I used both silver and red to where outside flap is silver and inside red, so the opposite of the wallet and lining but, again, get creative!

Step 5. Position flap pattern piece on the tape and cut shape out.

Flap piece cut out.

Step 6. Cut another strip of tape slightly longer than 3 inches for the outside side of the back of the wallet.

Step 7. Position the flap piece on this tap as shown so the corner of the flap pieces is flush with the edge of back pieces of the wallet.

Step 8. Cut the one more piece of tape (your lining color) place over the wallet back and flap pieces to sandwich in the tab of the flap.

Back of wallet with flap.

Step 9. Use the same pattern piece you cut out in step 3, align with flap and cut out back of the wallet.

Finished back piece of the wallet with flap.

Step 10. Set aside front and back pieces to be assembled next.

Step 11. Tape down a length of duct tape to a clean surface and use razor to cut 1/2” vertical strips to attach front and back of wallet along sides.

Step 12. Align side strips with the top of the wallet and attach to the front with a little more than half off to each side.

Step 13. Fold the strips over and press hard to attach the front and back of the wallet. Cut the excess strips flush with bottom of wallet.

Step 14. Cut another length of tape about 4” and cut a 1/2” horizontal strip.

Step 15. Tape horizontal strip to the bottom of the wallet, again with a little more than half off the bottom, just like the side. Fold and press to seal the bottom of the wallet.

Step 16. Cut excess tape flush with the sides of the wallet.

This is how the wallet should look now with red outside and silver lining...you’re nearly done!

Step 17. Cut the corner off an adhesive square of hook and loop tape (Velcro®) to make a closure for the flap.

Step 18. Attach one sticky side to the inside of the wallet flap.

Step 19. Close the flap just how you want it and press hard to stick the other side of the hook and loop tape to the main part of the wallet.

That’s it, you’re done! Now all that’s left is to print out your money and make your credit card to fill up the wallet :)
Now, don't forget to go grab the PDF download of these instructions that includes the free money and credit card printables...